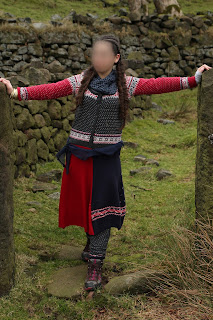
I sourced the jumpers that I used from my local charity shop, so as to save money on the cost of the project and because it meant I would be using items that where already finished along the edges. This made the whole project a lot faster and made the final outcome look more professional.
If you'd like to make one for yourself, here's what you'l need:
- A sewing machine
- thread
- 2 jumpers
- 2 cardigans (or 1 if you skip the part where I replace the arms)
So with out further to do, let's get onto how I made the dress:
- Firstly I took the first cardigan and carefully removed the sleeves at the shoulder seam.
- I then removed the sleeves (at the shoulder seam) from the other cardigan.
- I then placed the sleeves of one cardigan on the other by simply reattaching the arms at the shoulders.
- Next I measured out the width of the cardigan (this includes both the front and back) and the divided the measurement by 4. This measurement will be the top width.
- Using this measurement as the top, I created trapezium like shapes from the two jumpers, making sure that I used the full width of the jumper at the bottom of the pattern piece. At this point don't forget to add seam allowance.
- Then I cut out these trapeziums, which left me with 4 pieces to make the skirt from.
- I attached these pieces to each other, making a complete skirt.
- Finally I attached the skirt to the cardigan (when doing this, it's important that you make sure that the cardigan is buttoned closed)
And there you have it, how to make a jumper dress. So as always,
I hope this has inspired you!


No comments:
Post a Comment