Showing posts with label Skirt. Show all posts

Friday, 4 March 2016

The jumper dress

Hey guys! So today, I want to share with you a dress that I made for a photo shoot last weekend. The dress was super easy to make. In fact I made the dress I'm about to show you in one afternoon.
 I sourced the jumpers that I used from my local charity shop, so as to save money on the cost of the project and because it meant I would be using items that where already finished along the edges. This made the whole project a lot faster and made the final outcome look more professional.

If you'd like to make one for yourself, here's what you'l need:

  • A sewing machine
  • thread
  • 2 jumpers
  • 2 cardigans (or 1 if you skip the part where I replace the arms)

So with out further to do, let's get onto how I made the dress:

  1. Firstly I took the first cardigan and carefully removed the sleeves at the shoulder seam.
  2. I then removed the sleeves (at the shoulder seam) from the other cardigan.
  3. I then placed the sleeves of one cardigan on the other by simply reattaching the arms at the shoulders.
  4. Next I measured out the width of the cardigan (this includes both the front and back) and the divided the measurement by 4. This measurement will be the top width.
  5. Using this measurement as the top, I created trapezium like shapes from the two jumpers, making sure that I used the full width of the jumper at the bottom of the pattern piece. At this point don't forget to add seam allowance. 
  6. Then I cut out these trapeziums, which left me with 4 pieces to make the skirt from.
  7. I attached these pieces to each other, making a complete skirt.
  8. Finally I attached the skirt to the cardigan (when doing this, it's important that you make sure that the cardigan is buttoned closed)  

And there you have it, how to make a jumper dress. So as always,
 I hope this has inspired you!

Friday, 1 January 2016

Most popular posts of 2015

So I wanted to look back over 2015 and I thought the best to do that would be to look at the top 3 most popular posts of 2015.

I don't know about you, but I can't wait to see what 2016 has in store.

Friday, 13 November 2015

OOTW: One item 4 ways

Hi, so this is something I've never done before but I've decided, I might as well try it out. I've used my favourite skirt, that I made and posted about here That post also shares how you too can make a skirt like this). So to further inspire you to make this skirt, I thought I might as well share some outfit ideas with you. I've never claimed to be some sort of fashionista, this is all just my personal style.

Outfit No.1

This outfit, is one that I would wear to church because I think it's slightly more fancy than what I might wear on a normal day, mainly due to the flower on the cardigan.
Details;
Cardigan: Mango
Necklace: Claire?
Skirt: Made by me (take a look here)
Leggings: Next
Boots: Primark

Outfit No.2

I find this outfit to be a bit more toned down, due to the comfy-ness of the jumper, than the previous outfit and so would wear this to college.
Details:
Jumper: Gift 
Necklace: Bijou Brigitte 
Skirt: Made by me (find out more about it here)
Leggings: Next
Boots: Fatface

Outfit No.3

This is the exact outfit I was wearing, on Christmas Eve last year. I don't know why but it makes me feel so festive when I wear this combination. It must be the star on the jumper.
Details:
Scarf: Gift
Jumper: TK MAX
Bracelet: Gift
Watch: Gift
Skirt: Made by me (you can find out more about it here)
Leggings:Next
Boots: Fatface (they're the same boots that I had on in the previous outfit)

Outfit No.4

This outfit screams winter time to me, as not only does it include a super cute Christmas jumper, it also has fluffy boots!
Details:
Jumper: Next
skirt: Made by me (for more information take a look here)
Leggings: Next
Boots: Gift

I hope this has inspired you! 
Let me know how you would style this skirt.

Sunday, 1 November 2015

One hundred posts later...

I can't believe it! This is my 100th post and to celebrate I thought I would look back at some of my favourite posts.

I posted about this skirt back in February and since then it's become one of my all time favourite skirts. Its tartan pattern is similar to what's in trend at the moment but the fact that it's jersey makes it so comfortable. If you're interested in finding out more, take a look here.
 These shorts are made from a pair of old t-shirts and I made them for my sister back in March. Since having posted about these I have also made a pair for myself and the shorts have been a real hit with my sister over the summer. To find out how you could make a pair for yourself simply take a look at my post.
Although the headbands above where my most recent project, I still had to share it as one of my favourites just due to the amount of fun I had making and designing them. If you'd like to find out how you too could make a headband like these, then take a look at this post to find out more.
I hope you've enjoyed looking back on these posts as much as I have and of course, I hope this has inspired you!


Thursday, 5 February 2015

My Tartan Winter Skirt

You can't deny that the tartan skirt has been the surprise star of fashion this year and when I first saw this style I knew that I really wanted one too. So I was super excited when I found a navy blue, red and white jersey tartan fabric for just 20p at my local fabric shop (I say local- it's actually a 2 hour drive away!). I completed this skirt in November and I've worn it almost everyday, that's how much I love it.
  By using a jersey I was able to make a slightly tighter fit. I made this skirt using the same technique as in my Boden skirt. The only change I made was to make the skirt slightly longer, so as to give that more sophisticated look that I love so much about the tartan skirt.
The hardest part of this project was the pattern matching due to the large block lines that are so unforgiving. But that is easily overcome if you're super careful and tack every thing before sending it through the sewing machine.
This was such a lovely skirt to make and is an even nicer skirt to wear.
I hope this has inspired you!

Thursday, 14 August 2014

My cousins sweet skirt

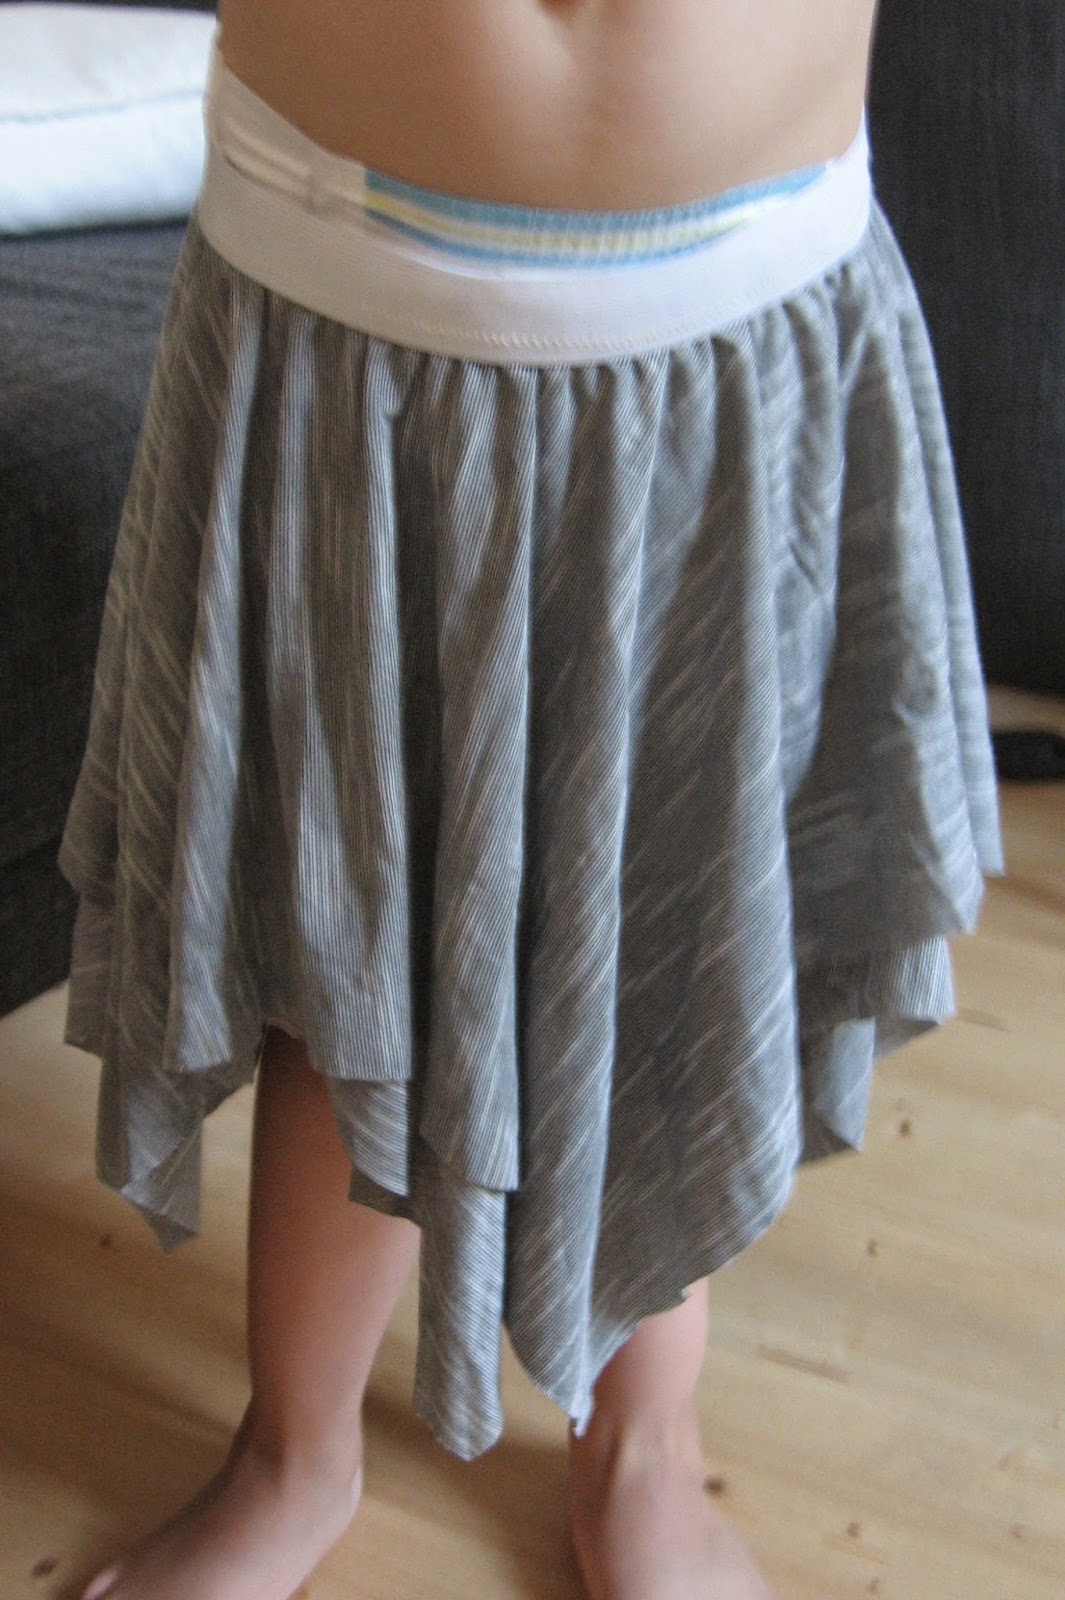
Recently I posted about the trousers I made for my cousin but at the time I didn't show you the skirt I made for her. I got my inspiration from pintrest ( i.e. this was not my own idea) and I thought the outcome was so sweet.

I made this skirt by cutting out two squares from a cool grey and white striped jersey. Then I placed the squares on a diagonal and cut a circle in the middle for the waist. Finally I attached the elastic and I was done; it was that simple. I love how such a simple concept can make such a cute skirt.

 
 This skirt is also good for climbing and generally playing in, as demonstrated by my cousin.:)
I hope this has inspired you!

Wednesday, 11 September 2013

september high waisted denim skirt

It's sad to say but autum will be here soon (as you can tell I adore summer, from my other post, and all it's bright colours) but it's not all doom and gloom because autum brings its own set of colours and gives me an opportunity to work with darker more subtle colours.

This can best be seen in the skirt bellow. I got the top half of this skirt (the orange bit) pattern from a pattern online, which sadly I can't find at the moment but if I find it again I will update this post.

The bottom part of this skirt was improvised making sure that I calculated in space from the widest part of my hips and added in seam allowence. The final result is a simple but autumery skirt that can be teamed with many diffrent styles.

 P.S. I'm so sorry that I haven't been blogging regularly because things are a bit hectic at the moment but as soon as they calm down I will hopefully be able to blog more regularly. 
I hope this has inspired you!

Friday, 23 August 2013

Mans shirt to cute skirt

FREE PATTERN
There will always be room in fashion for cute skirts and what's better than having the satisfaction of saying you made one yourself. Well here's a quick (30 minutes) skirt that you can make from an old mans shirt. I made my skirt out of an old stripy shirt of my Dads.

You will need:

  • An old, mans, shirt (the larger the shirt the more volume there will be in your skirt)
  • a sewing machine (although this can be done by hand if you are ok with sewing with jersey)
  • plain black, or any colour that matches that of your shirt, jersey.
  • thread that matches your skirts base colour.

Instructions:

  1. First cut the shirt to just bellow the arms
  2. Then sew down the button fastenings so that the skirt won't be able to be opened by the buttons.
  3. Next measure your hips (or waist depending on where you want the skirt to sit) and cut out a length of jersey material that is your hip measurement in width and is about 11cm (4 inches) in height.
  4. Finally attach your strip of jersey to your skirt/ cut up shirt. This yoga styled waist band is better explained in my active skirt pattern.
I hope this has inspired you!

Wednesday, 24 July 2013

High-low skirt tutorial


I first saw these skirts in South Korea, whilst on holiday. Once home I couldn't find any I liked the look of so I decided to make my own. I took pictures along the way to show you how I made it.

  • I started out with a dress that was a few sizes to large for me.
  • From here I cut off the top of the dress (the part where the arm holes finished).
  • Next I folded over the top of the skirt to make a waist band to insert elastic. For my elastic I measure around the part of my hips I wanted the skirt to sit and cut off that length of elastic. I didn't add any seam allowance, so as to make the elastic stretch when I'm wearing the skirt. This gives it a nice fit.

  • Once the elastic was inserted I pinned on an s shaped line and cut along it. ( Just a little tip, the pins can then be moved until you have the shape you want before taking the scissors to your garment)
  • Then simply hem and your high low skirt is completed.
This skirt is great for both formal occasions and informal occasions.

I hope this has inspired you!

Wednesday, 3 July 2013

comfy evening skirt

I may have mentioned before that I went with my family to South Korea but what I didn't mention is that Gwangjang market by day is a sewers heaven. I could have quite easily spent an entire day there but knew that it wouldn't be fair on my family if I did. While there I found a beautiful red fabric with black flowers on which I knew would be brilliant for a dramatic piece of clothing. When we returned home I searched the internet for an idea for what I could do with the material. I eventually decided to make a maxi evening skirt. My inspiration came from this post on my favourite sewing blog.

To create this skirt I basically followed what the original blog post suggested and used this pattern, which I had already from making this skirt, and the bottom half of my maxi dress.

I love the denim skirt pattern because it allows you to make custom fitting skirts. Also this proves that it can be used to make other styles of skirts.

Finally I added a yoga style waist band, hemmed the skirt and I was done. Unlike other evening skirts this one is super comfy due to it being made from jersey.
I hope this has inspired you!
Shout out to Dan! (You know why)

Monday, 17 June 2013

Boden Skirt

Free Pattern

This pattern is great for beginners or an easy sew for more experienced sewers. My inspiration came from this Boden/ JonnieB skirt. I hope you enjoy making this custom made skirt.


You will need:

  • Striped jersey material. The original skirt was blue and white but any coloured stripes would work. To find out how much fabric you need see step 2 in the instructions.
  • Contrasting elastic, I used red but it depends on the colours of your stripes. The elastic should be around 6cms wide (about 2.4 inches). To find out how much you need see step 1 in the instructions.    
  • Thread that matches both your striped material and your wide elastic.


 Instructions

  1. To work out how much elastic you will need measure around your hips. DON'T add on seam allowance because it's the stretch in the elastic that keeps your skirt up. 
  2. To work out how much fabric you need multiply your hip measurements by 1.15 and add on seam allowance (i.e. it should be 15%, plus seam allowance, bigger than your elastic in width). Make sure that the stripes are parallel to this length of the fabric. This should allow for leg movement but still be tight fitting. For length measure from the bottom of your hips to your mid/ lower thigh and add on seam allowance (depending on how long you wish the skirt to be). I would suggest you go no longer than your lower thigh because this may infringe on your leg movement.  
  3. Cut your fabric and elastic in half.
  4. Attach a piece of elastic onto one of your jersey pieces. Use the thread that matches your elastic. Do this by laying the elastic on top of the side that should be half of your hip measurement (the top of the jersey piece should not be visible when done but the finished side of the elastic should be visible). Start sewing. While sewing pull on the elastic to make it the same length as your piece of jersey.
  5. Repeat step 4 on the others of jersey and elastic.
  6.  Now sew the 2 pieces of elasticated jersey together. Right sides facing and the elastics facing each other. This should be done in a thread that matches your jersey material.  
  7. Now simply hem the bottom of the skirt (the side with no elastic).
Voila! You have your own custom made Boden skirt. 
I hope this has inspired you!

Monday, 15 April 2013

High waisted denim skirt

A few months ago I posted about a denim skirt I had made using an ebook.  I really enjoyed making it and had some denim material left over, however I didn't have enough to make a full denim skirt. So I had a look through my box of materials and found some lovely pink flouty material, which I had got a while back in a 60p pack from Abakhans. The combanation made a wonderful skirt.


I followed the ebooks instructions for the top half and then gathered the pink material to give the skirt a floaty summer look. I say that I "followed" the ebook but I totally forgot about the part where you make the pattern given fit you and so ended up with a tight fitting high waisted skirt. Although it wasn't ment to be high waisted I think it actually works quite well. Funny how mistakes can sometimes turn out amazingly well!

I hope this has inspired you!
Sunday, 17 March 2013

Active skirt

FREE PATTERN

This skirt is so simple to make and is great for looking stylish but still being able to go about every day activities. I came across the idea for this skirt by buying a 60p pack from abakhans and the stripy material bellow was in it.


You will need:

Spandex material
Sewing machine (set to zigzag stich)
Thread

Instructions:
First measure your hips. Cut out a piece of this fabric that is the length you just measured (DON'T add any seam allowence as the strech of the spandex is what will keep the skirt up) by 16cm. This will become your waist band.

Next cut out a piece of fabric that is between 1.5 and 2 times your hip measurement in width (this measurement will depend on how loose you want the main part of your skirt to be) by the length you want your skirt to be plus hemming allowence ( I would suggest a length that comes to mid way between your hip and your knee or just bellow).

Now sew the waist band (folded in half) onto the larger piece of fabric streching the waist band as you go so as to make ruffles in your skirt.

Once the last step is complete sew the two oposite sides together (right sides facing) so as to make a tube.

Finally hem your skirt. Now you have the perfect active skirt!

I hope this has inspired you!

Sunday, 10 March 2013

Bed sheet skirt/ blouse

FREE PATTERN

This was my expermental piece, so I didn't want to waste good fabric (I used my little sisters old bed sheet) however this pattern is heaverly reliant on the material used.


You will need:

an old bed sheet
a zipper
thread
a sewing machien (it can be done by hand however it will take alot longer)

Instructions:

Measure your waist. After taking your measurements add on a 2cm seam allowance.
Now cut out a piece of your fabric, which is your waist measurement plus SA by  14cm.
Next measure from your waist to your knee (don't add any seam allowance to your measurement because when it is heamed it will come just above your knee).
After taking your waist to knee measurement cut out a piece of fabric, which is the length you just measured by twice the length of your waist measurement plus SA.
Next sew a straight stich allong the width of the larger piece of fabric and gather it untill it is the same length as your waist band.
To create your waist band fold it in half and sew the long not folded edge to the gathered side of the larger piece of material.
Now sew the sides together but don't sew the waist band together as now you need to install your zipper.
Finally hem the bottom and you should have a skirt (and if your like me and don't have large breast it will also work as a strapless blouse).


I hope this has inspired you!